
WP-CLI
WP-CLI is the command-line interface for WordPress. It lets you manage your WordPress installation directly from the command line. There are many ready-to-use commands (check the full list here), the most frequently used one by me is search-replace since it is on par if not significantly faster than other tools that I used for the same job.
In this article, I wanted to dig into creating a custom WP-CLI command from scratch in a theme and compare it to Symfony commands (implemented in Shopware) since they inspired me to check out this topic.
Installing client
To use the WP-CLI first you need to install it, there are few possible ways described in the Installing section on the official page but on my local machine I’ve just used brew to do everything for me:
brew install wp-cliOnce installed navigate to your project WordPress root folder in terminal and type in wp , if you will see the help description then everything was installed correctly.
Setting up theme
To create a custom command in your theme you’ll need to install special packages. I already had Composer set up in theme so all that was required to start was running this:
composer require wp-cli/wp-cli-bundleCode language: JavaScript (javascript)While it is a simple set up finding it out wasn’t that obvious, at least for me.
Creating commands
To add your custom command first you have to use WP_CLI::add_command() to register it. You can use a function or, as in our case, a class. We can also specify special arguments – more on add_command usage here.
WP_CLI::add_command('bold:command:test', new CommandTest(), [
  'shortdesc' => 'Runs test command',
  'synopsis' => [
    'type'        => 'assoc',
    'name'        => 'optional-var',
    'description' => 'Type something here...',
    'optional'    => true,
  ],
  [
    'type'     => 'flag',
    'name'     => 'hello',
    'optional' => true,
  ],
]);Code language: PHP (php)
Once you paste this in a place that is always executed when the theme is running you can move to the actual command.
namespace Bold\Module\WpCli\Commands;

use WP_CLI;

class CommandTest
{
  public function __construct()
  {
    // you can pass arguments to constructor and set up everything here like in a normal class
  }

  public function __invoke($args, $assoc_args)
  {
    WP_CLI::log(WP_CLI::colorize('%3%k-----===========-----%N'));
    WP_CLI::log(WP_CLI::colorize('%3%k ' . date('H:i:s d-m-Y') . ' %N'));
    WP_CLI::log('');
    WP_CLI::log('Starting test command...');
    WP_CLI::log('');

    if (isset($assoc_args['hello'])) {
      WP_CLI::log('Well hello to you too sir!');
      WP_CLI::log('');
    }

    if (!empty($assoc_args['optional-var'])) {
      WP_CLI::log('Optional var detected!');
      WP_CLI::log('You typed in: ' . $assoc_args['optional-var']);
      WP_CLI::log('');
    }

    try {
      throw new \Exception("Error Lorem Ipsum", 1);
    } catch (\Throwable $th) {
      WP_CLI::debug(WP_CLI::colorize('%1%k ' . $th->getMessage() . ' %N'), 'Bold-test-cmd');
    }

    if (rand(0, 1)) {
      WP_CLI::success('Command succedeed!' . PHP_EOL);
    } else {
      WP_CLI::error('Command FAIL!', false); //do not stop command here
      WP_CLI::log('Unlucky... Try again');
    }

    WP_CLI::log('');
    WP_CLI::log(WP_CLI::colorize('%3%k ' . date('H:i:s d-m-Y') . ' %N'));
    WP_CLI::log(WP_CLI::colorize('%3%k-----===========-----%N'));
    WP_CLI::halt(1); //stop now
  }
}Code language: PHP (php)
Even though there it seems that there is a lot of code in the CommandTest class most of it is output formatting that I added so the console printout is easier to read.
Let’s go through the code, firstly we have a standard constructor, you can totally pass some needed variables to your class or do any other kind of setup there. Since I wanted to keep code simple here I didn’t add any separate methods eve though I could.
Next, there is __invoke function. This is what is executed when you run the command via the terminal. You can expect arguments being passed in $args or in $assoc_args with the difference being that in the second variable there will be associative arguments of course.
I’m starting function by printing out a few lines so it is easier for me to see what is going on. Printing is done by using WP_CLI::log() – just pass whatever you want to see in the terminal as a string.
Inside log() I’m often using WP_CLI::colorize() to style the printed text. There is a list of color tokens to use here, in this case, I’m using yellow background with black text and then resetting the style with %N at the end of the line.
In the add_command() I’ve defined a flag and optional var – these will be accessible via $assoc_args. For the purpose of this example, I’m just doing prints to console to show how it could be implemented.
The WP_CLI::debug() that I’m using in the try-catch is a neat function. It allows you to implement many debug messages that will only be displayed with the –debug flag so by default, you can have a nice, clean output and once something goes wrong you are able to see some more detailed feedback.
To inform that your script ended successfully you can use WP_CLI::success(), this will display the passed message but will not exit the function.
To indicate that the script failed you can use WP_CLI::error(). By default, it will exit your script but in the example, I’m setting the second parameter to false to prevent that since I wanted to do few more things after fail.
Finally, I’m using WP_CLI::halt() to force stop the execution once everything is done.
Using the command
Once you place the code in the correct for your theme place just type in console
wp bold:command:testCode language: CSS (css)In my case, this was the output:
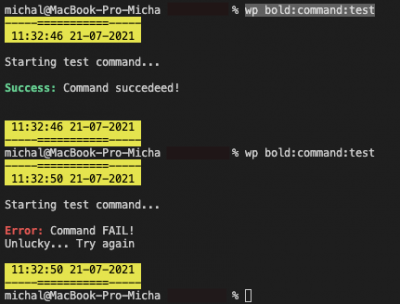
I mentioned using --debug flag, here is how the output looks like:
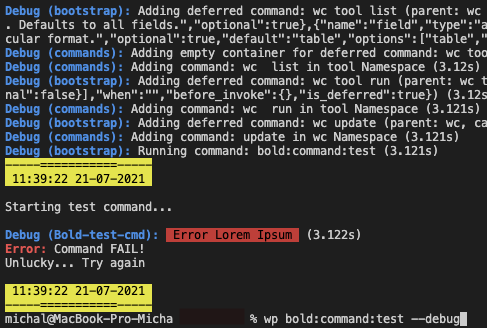
As you can see there is already a number of debug prints from WooCommerce that was set up in WordPress, after them, there is our expected debug print.
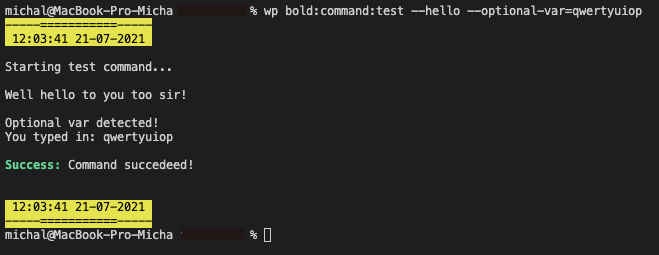
We’ve also specified a flag and optional var, here is how to use them:
Symfony (Shopware)
Recently I’ve had a little contact with Shopware, the Shopware itself is a topic for another blog post or even a few of them. Because that setup is completely different to what you know from WordPress and I’ll just skip most of it, what you need to know is that it is based on Symfony and because of that, we are able to use Symfony Console Commands.
Creating commands
Instead of WP_CLI::add_command() here we just have to register a new service.
<service id="Bold\Command\TestApiConnection">
    <argument type="service" id="Bold.api" />
    <tag name="console.command"/>
</service>Code language: HTML, XML (xml)
This is a part of an existing command, next to the required console.command tag there is an argument that will be used in the command class.
namespace Bold\Command;

use Bold\Api\Api;
use Symfony\Component\Console\Command\Command;
use Symfony\Component\Console\Input\InputInterface;
use Symfony\Component\Console\Output\OutputInterface;

/**
 * Handles product sync command and its setup
 */

class TestApiConnection extends Command
{
  private ?Api $api = null;

  public function __construct(Api $api)
  {
    parent::__construct();
    $this->api = $api;
  }

  protected function configure(): void
  {
    $this->setName('bold:api:test');
    $this->setDescription('Runs test of connection to API.');
  }

  protected function execute(InputInterface $input, OutputInterface $output): int
  {
    $output->writeln('');
    $output->writeln("<fg=black;bg=yellow>----=================----</>");
    $output->writeln("<fg=black;bg=yellow> " . date('H:i d-m-Y') . "        </>");
    $output->writeln("<fg=black;bg=yellow> Sending test request... </>");

    $result = $this->api->orders->paged();
    if (! empty($result['data']['data'][0])) {
      $output->writeln('');
      $output->writeln("OrderID: " . $result['data']['data'][0]['OrderID']);
      $output->writeln("mail : ...@" . explode('@', $result['data']['data'][0]['eMail'])[1]);
      $output->writeln('');
      $output->writeln('======');
      $output->writeln('');
    }

    if (! empty($result['data']['state']['code'])) {
      $output->writeln("State code: " . $result['data']['state']['code']);
      $output->writeln('');
    }

    if (! empty($result['data']['state']['message'])) {
      $output->writeln("State message: " . $result['data']['state']['message']);
      $output->writeln('');
    }

    if (! empty($result['data']['state']['status'])) {
      $output->writeln("State status: " . $result['data']['state']['status']);
      $output->writeln('');
    }

    $output->writeln("\n<fg=black;bg=yellow> " . date('H:i d-m-Y') . "        </>");
    $output->writeln("<fg=black;bg=yellow> Test finished           </>");
    $output->writeln("<fg=black;bg=yellow>----=================----</>");
    $output->writeln('');
    return 0;
  }
}Code language: PHP (php)
This is the implementation of a command that was used to test one of the APIs used in the project. Looking through the code there is immediately a difference in structure.
Firstly, the constructor matters. In this case, I’m grabbing the needed variable after calling the constructor of the parent class – all commands need to extend the Symfony Command class.
The configuration of the command is being done inside the configure() method. Here, we’re only setting up the name and general description but can also set up arguments and options.
The last method in the class is as its name tell us the one which actually runs then you call your command. Inside, I’m doing basically the same output formatting as in the WP-CLI example, you can find more details on how to style the output here.
In this case, there are no arguments or options but if you were to add some they would be accessible via $input var that is passed to the method.
// inside configure()
$this->addArgument('argFoo', InputArgument::REQUIRED, 'Some required argument');
$this->addOption('optBar', 'b', InputOption::VALUE_NONE, 'Some optional option, in this case basically a flag');

// inside execute()
$arg = $input->getArgument('argFoo');
$opt = $input->getOption('optBar');Code language: PHP (php)
As you can see you can specify how argument/option should behave with InputArgument consts. Options also have a shortcut.
At the end, depending on the Symfony version, you just return 0 like in a C program or, if in newer Symfony, return Command::SUCCESS (FAILURE and INVALID constants may be also available).
Using the command
The commands are being executed just like in any Symfony project via bin/console script.
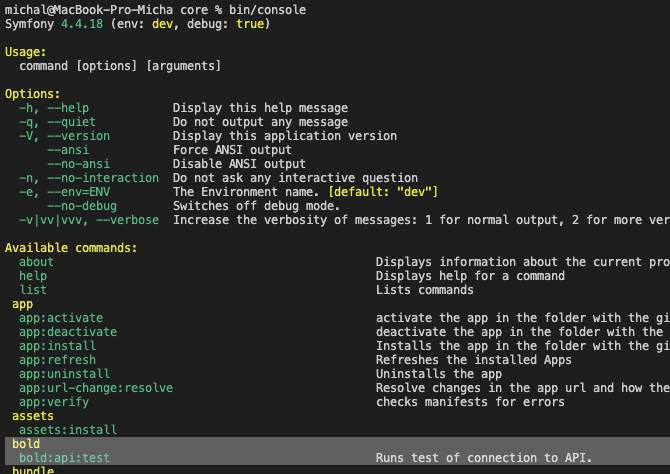
Since there can be a lot of commands you can use grep to filter them.

To see help for the exact command just add -h at the end.
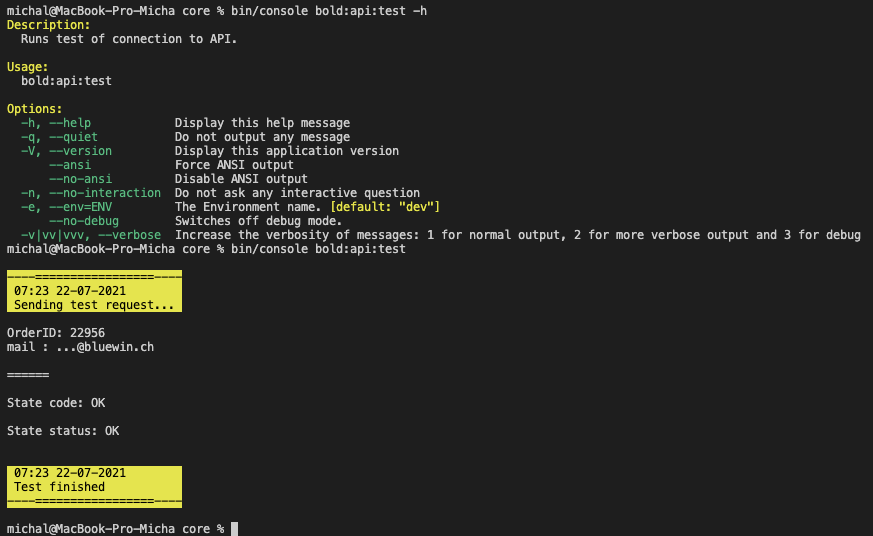
Above you can also see the output of the executed command.
Summary
While installing and using WP-CLI in your local environment is fairly easy doing that on a production server may be quite a challenge. Depending on your hosting provider a number of system features might be not available to you. For example, you may not be able to SSH into your server – better providers let you do that but there really is no general rule here.
Symfony, on the contrary, has just a set of requirements to be able to run on a “remote” server. Because of that, the needed features to run commands are basically always there. So all you have to do is SSH into the server and run the commands.
WP-CLI is being described to be a “swiss army knife” but starting with it wasn’t so obvious as I thought it would be. Working with it wasn’t as I’ve imagined from all the encouraging descriptions. Even though Shopware itself is quite hard to work with because it is based on Symfony and commands are basically a “Symfony thing” they work very well. I liked working with the Symfony commands much more – the programming and using feels more “natural” to me.
You may also wonder why to even implement such commands. For me, they were very useful while debugging problems on live servers – you can prepare a command that test connection with some API or other things. This way you are creating a kind of automated test that lets you check a given thing in a moment with a simple command. This could be also very beneficial when a new developer joins a project and needs to work with a system unfamiliar to him/her – with such commands developers can easier perform tasks without knowing details of systems.